
How to Block Your Crochet Projects for a Professional Finish
“Level up your crochet game with perfectly blocked projects – the key to a polished and professional finish.”
The Importance of Blocking in Crochet: Tips and Techniques for a Polished Look
Crocheting is a beloved craft that has been around for centuries. It involves creating beautiful and intricate designs using yarn and a crochet hook. Whether you are a beginner or an experienced crocheter, one thing that can take your projects to the next level is blocking. Blocking is a technique used to shape and smooth out your crochet projects, giving them a professional and polished finish. In this article, we will discuss the importance of blocking in crochet and provide tips and techniques for achieving a flawless result.
First and foremost, let’s understand what blocking is and why it is necessary. Blocking is the process of wetting or steaming your crochet project and then shaping it to the desired size and dimensions. This technique is particularly useful for projects made with natural fibers such as wool, cotton, or silk, as they have a tendency to stretch or shrink. By blocking your project, you can ensure that it maintains its shape and size, giving it a neat and tidy appearance.
One of the main reasons why blocking is essential in crochet is to even out the tension in your stitches. When crocheting, it is common for some stitches to be tighter or looser than others, resulting in an uneven and bumpy surface. Blocking helps to smooth out these inconsistencies, giving your project a more professional and uniform look. It also helps to open up lacework and intricate stitch patterns, making them more visible and defined.
Now that we understand the importance of blocking let’s discuss some tips and techniques for achieving a polished finish. The first step is to choose the right blocking method for your project. There are two main methods of blocking in crochet – wet blocking and steam blocking. Wet blocking involves soaking your project in water, gently squeezing out the excess, and then pinning it to a flat surface to dry. This method is suitable for natural fibers and can help to relax and reshape the yarn. On the other hand, steam blocking involves using a steam iron or steamer to lightly steam your project, followed by shaping and pinning it to dry. This method is more suitable for synthetic fibers and can help to set the stitches in place.
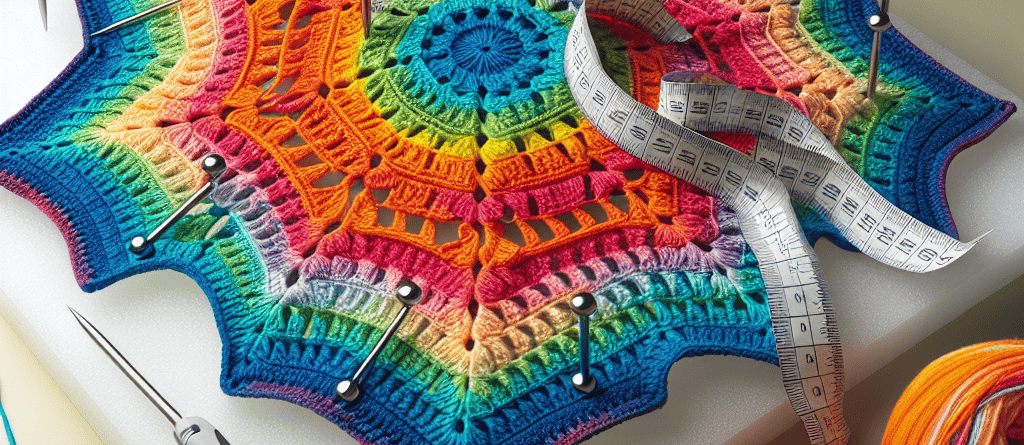
Another important tip for blocking is to use the right tools. Blocking mats, T-pins, and blocking wires are essential for achieving a professional finish. Blocking mats provide a flat and stable surface for pinning your project, while T-pins and blocking wires help to hold your project in place and maintain its shape. It is also crucial to use rust-proof pins and avoid using regular sewing pins, as they can leave rust stains on your project.
When it comes to blocking, timing is everything. It is essential to block your project at the right time to achieve the best results. For natural fibers, it is recommended to block your project before seaming or adding any embellishments. This allows the yarn to relax and settle into its final shape. For synthetic fibers, it is best to block your project after seaming and adding any embellishments, as the steam can help to set the stitches in place.
In conclusion, blocking is a crucial step in achieving a professional and polished finish in crochet. It helps to even out tension, open up stitch patterns, and maintain the shape and size of your project. By following the tips and techniques mentioned in this article, you can take your crochet projects to the next level and create beautiful and flawless pieces. So the next time you finish a crochet project, don’t forget to block it for that perfect and polished look.
Step-by-Step Guide to Blocking Your Crochet Projects for a Professional Finish

Crocheting is a beloved hobby for many, and it’s no surprise why. The process of creating something beautiful and useful with just a hook and some yarn is both satisfying and therapeutic. However, even the most skilled crocheters can sometimes struggle with achieving a professional finish on their projects. This is where blocking comes in.
Blocking is a technique used to shape and smooth out crocheted items, giving them a polished and professional look. It involves wetting the item and then stretching and pinning it into the desired shape and size. This process can be intimidating for beginners, but with the right tools and techniques, anyone can achieve a perfectly blocked crochet project. In this article, we will guide you through the step-by-step process of blocking your crochet projects for a professional finish.
Step 1: Gather your materials
Before you begin blocking, make sure you have all the necessary materials. You will need a large flat surface, such as a blocking board or a clean towel, rust-proof pins, and a spray bottle filled with water. You may also want to have a measuring tape and a ruler on hand to ensure accuracy in shaping and sizing your project.
Step 2: Prepare your project
Start by gently washing your crocheted item with a mild detergent. This will remove any dirt or oils that may have accumulated during the crocheting process. Rinse the item thoroughly and gently squeeze out excess water. Do not wring or twist the item, as this can damage the fibers and affect the final shape of your project.
Step 3: Stretch and pin
Lay your damp project on the flat surface and gently stretch it to the desired shape and size. Use your measuring tape and ruler to ensure that all sides are even and symmetrical. Once you are satisfied with the shape, start pinning the edges of the project to the surface. Use rust-proof pins to avoid any discoloration on your project. For larger items, you may need to use more pins to secure the edges and prevent them from curling up.
Step 4: Mist with water
Using your spray bottle, mist the entire project with water. This will help the fibers relax and settle into the desired shape. Be careful not to oversaturate the project, as this can cause the colors to bleed or the fibers to become too stretched out.
Step 5: Let it dry
Once your project is pinned and misted, leave it to dry completely. This can take anywhere from a few hours to a full day, depending on the size and thickness of your project. It’s important to let the project dry completely before unpinning it, as this will ensure that the shape is set and will not change once the pins are removed.
Step 6: Unpin and admire
After your project is completely dry, carefully remove the pins and gently lift the project off the surface. You will notice that the fibers have relaxed and the project has taken on a smooth and polished appearance. Admire your work and revel in the satisfaction of achieving a professional finish on your crochet project.
In conclusion, blocking is an essential technique for achieving a professional finish on your crochet projects. With the right tools and techniques, anyone can master this skill and take their crocheting to the next level. So the next time you finish a project, don’t be afraid to give it a good blocking for that perfect, polished look. Happy crocheting!
Common Mistakes to Avoid When Blocking Your Crochet Projects and How to Fix Them
Crocheting is a beloved hobby for many, and it’s no surprise why. The process of creating something beautiful and useful with just a hook and some yarn is both satisfying and therapeutic. However, as with any craft, there are certain techniques that can take your crochet projects to the next level. One such technique is blocking.
Blocking is the process of shaping and stretching your crochet project to achieve a more professional and polished finish. It involves wetting the project and then pinning it into the desired shape and size. While blocking may seem like an extra step, it can make a significant difference in the overall appearance of your project. However, there are some common mistakes that crocheters make when blocking their projects, which can lead to less than desirable results. In this article, we will discuss these mistakes and how to avoid them for a flawless finish.
The first mistake that many crocheters make when blocking their projects is not using the correct materials. When it comes to blocking, the right tools are essential. The most crucial tool for blocking is a blocking board or mat. These boards are made of foam or cork and have grid lines to help with measuring and shaping your project. Using a regular towel or carpet can lead to uneven blocking and can also damage your project. Additionally, using rust-prone pins or needles can leave stains on your project, so it’s best to invest in stainless steel or rust-proof pins.
Another common mistake is not properly measuring and shaping the project before pinning it. It’s essential to have a clear idea of the finished size and shape of your project before starting the blocking process. This will help you determine the correct measurements and ensure that your project turns out the way you want it to. It’s also crucial to use enough pins to hold your project in place. Not using enough pins can result in uneven blocking and can cause your project to lose its shape once it dries.
One of the most significant mistakes that crocheters make when blocking is not using the right technique for their project. There are two main techniques for blocking crochet projects – wet blocking and steam blocking. Wet blocking involves soaking your project in water and then pinning it into shape. This technique is best for natural fibers such as wool, cotton, and silk. On the other hand, steam blocking involves using a steam iron or steamer to shape your project. This technique is suitable for synthetic fibers such as acrylic and nylon. Using the wrong technique can lead to irreversible damage to your project, so it’s crucial to choose the right one.
Another mistake that many crocheters make is not allowing their project to dry completely before unpinning it. It’s essential to be patient and let your project dry completely before removing the pins. This can take anywhere from a few hours to a day, depending on the size and thickness of your project. Rushing the process can result in your project losing its shape and not achieving the desired finish.
In conclusion, blocking is a crucial step in achieving a professional finish for your crochet projects. However, it’s essential to avoid these common mistakes to ensure that your project turns out the way you want it to. By using the right materials, measuring and shaping your project correctly, choosing the right technique, and being patient, you can achieve a flawless finish every time. So the next time you finish a crochet project, don’t forget to block it for that extra touch of perfection.
Q&A
1. What is blocking in crochet?
Blocking in crochet is a technique used to shape and smooth out your finished crochet projects. It involves wetting the project and then stretching and pinning it into the desired shape and size, allowing it to dry in that shape.
2. Why is blocking important for crochet projects?
Blocking is important for crochet projects because it helps to even out stitches, open up lace patterns, and give a more professional and polished finish to the project. It can also help to correct any uneven tension or shape irregularities in the project.
3. How do you block a crochet project?
To block a crochet project, you will need to wet the project by either soaking it in water or spraying it with water. Then, gently stretch and shape the project to the desired size and pin it in place on a blocking board or mat. Allow the project to dry completely before unpinning it. For more delicate projects, you can also use steam blocking by hovering a steam iron over the project without touching it.


LEAVE A COMMENT